6. Modifying Advertising Parameters
In this section, we will modify various advertising parameters such as the advertised Bluetooth Device Name, the advertising interval and the Bluetooth Device Address.
6.1. Modifying the Bluetooth Device Name
The Advertiser Demo is currently advertising the name “Renesas ADV Demo”.
To change this name, open main.c and scroll down to the comment BLE adv demo advertising data where the name is defined as part of the advertising data, adv_data[].
The advertising data must follow a specific set of rules. The initial data contains the following:
A length field that specifies the length of the name itself plus the length of the type of data it contains
The type of advertised data (one octet) which in this case is the
GAP_DATA_TYPE_LOCAL_NAME- a.k.a. the Bluetooth Device Name TypeThe data itself. In this case, a number of characters resulting in the name “Renesas ADV Demo”
/*
* BLE adv demo advertising data
*/
static const uint8_t adv_data[] = {
#if dg_configSUOTA_SUPPORT
     0x03, GAP_DATA_TYPE_UUID16_LIST_INC, 0xF5, 0xFE,
#endif
     0x11, GAP_DATA_TYPE_LOCAL_NAME,
     'R', 'e', 'n', 'e', 's', 'a', 's', ' ', 'A', 'D', 'V', ' ', 'D', 'e', 'm', 'o'
};
Replace the adv_data[] definition as shown below to change the advertised name to “My Demo”:
/*
* BLE adv demo advertising data
*/
static const uint8_t adv_data[] = {
#if dg_configSUOTA_SUPPORT
     0x03, GAP_DATA_TYPE_UUID16_LIST_INC, 0xF5, 0xFE,
#endif
   0x08, GAP_DATA_TYPE_LOCAL_NAME,
   'M', 'y', ' ', 'D', 'e', 'm', 'o'
};
Note
Notice that the first octet, the length field, now counts the number of characters in “My Demo” + 1 octet = 0x08. This is because the length field includes the octet specifying the type of data
Build the modified code and run it using the debugger. Verify that the advertised name has changed to “my Demo” using the SmartBond™ Scanner smartphone app.
Connecting to the device using the SmartBond™ Scanner smartphone app we can open the Generic Access Service, and read the Device Name. This name must match the advertised name, but it clearly doesn’t.
To fix the name, open main.c and scroll down to the application task implementation: OS_TASK_FUNCTION(ble_adv_demo_task, pvParameters).
A few lines down, you will see a call to ble_gap_device_name_set(). It currently looks like this:
/* Set device name */
ble_gap_device_name_set("Renesas ADV Demo", ATT_PERM_READ);
Just change it to:
/* Set device name */
ble_gap_device_name_set("My Demo", ATT_PERM_READ);
Build the modified code again and run it using the debugger. The issue should be fixed.
6.2. Modifying the Advertising Interval
The Advertiser Demo is advertising on all 3 advertising channels at an interval of 687.5ms. You can use the SmartBond™ Scanner smartphone app to verify this. Keep in mind that a smartphone app will only give you a rough estimate of the advertising interval, and if accuracy is required, you will need to either use a real BLE sniffer or use the Power Profiler of SmartSnippets Toolbox.
The app will display the rough interval as highlighted below:
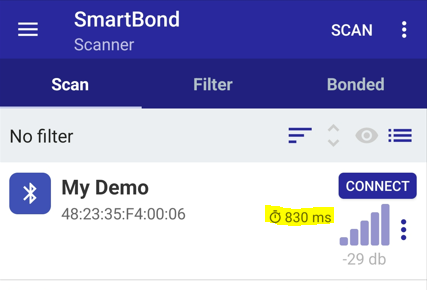
Figure 1 Original Advertising Interval - in reality, the interval is 687.5ms +/-5ms.
The default advertising interval and other default Bluetooth parameters are defined in the file \sdk\ble\config\ble_config.h.
It is not recommended that you modify values in this file, however. Instead, we should over-write such values in a project configuration file.
The Advertiser Demo project has two different custom config files - one for builds that include SUotA and one that doesn’t.
We will be building our code without SUotA support at this time, so we will modify the file \config\custom_config_eflash.h.
Add the following two lines to the \config\custom_config_eflash.h file below the “BLE Configuration” comment:
#define defaultBLE_ADVERTISE_INTERVAL_MIN    (BLE_ADV_INTERVAL_FROM_MS(100))  // 100ms
#define defaultBLE_ADVERTISE_INTERVAL_MAX    (BLE_ADV_INTERVAL_FROM_MS(100))  // 100ms
Build the modified code again and run it using the debugger. Using the SmartBond™ Scanner smartphone app, we can verify that the Interval has changed:
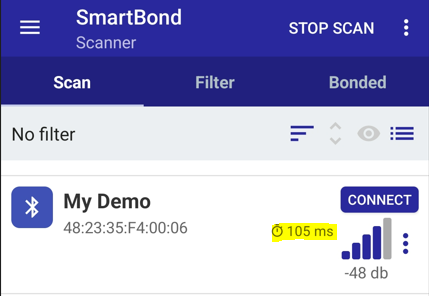
Figure 2 Modified Advertising Interval - in reality, the interval is 100ms +/-5ms.
The changes we just made to modify the advertising interval sets the default values, but in some cases we might want to modify the interval dynamically.
The BLE API provides a function call, ble_gap_adv_intv_set(),that we can use for this purpose. We must use this call before we start advertising.
In our ble_adv_demo_task found in main.c, we can change the interval before we start advertising:
ble_gap_adv_intv_set(BLE_ADV_INTERVAL_FROM_MS(400), BLE_ADV_INTERVAL_FROM_MS(400));
In this case we are setting the interval to 400ms, and we should be able to verify that using the app:
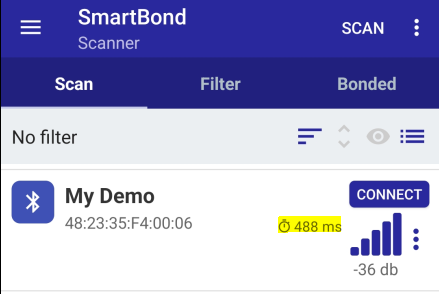
Figure 3 Dynamically Modified Advertising Interval - in reality, the interval is 400ms +/-5ms.
Section 5.1.2 of the DA1459x SW Platform Reference Manual details the entire BLE API.
6.3. Changing the BD Address
Using the BLE API, we can also modify the Bluetooth Device Address during runtime (before we start advertising). The SmartBond™ specification defines two types of addresses:
Public Addresses (Addresses that are registered with IEEE)
Random Addresses (These are not registered with IEEE)
Note
The term random address is somewhat misleading. In reality these addresses can be random, but they do not have to be! A better term would be “Non-Public”.
We can modify the Bluetooth Device Address using the ble_gap_address_set() function.
This function takes two arguments:
The new address (The type of address and the new address)
The refresh rate (we will set it to 0 so the address doesn’t change)
Place the following code snippet in the main.c file before we start advertising:
// Change the BD Address
struct own_address my_bdaddr;
ble_gap_address_get(&my_bdaddr);
my_bdaddr.addr_type = PRIVATE_STATIC_ADDRESS;
const uint8_t my_new_address[] = {0xEE, 0xFF, 0xC0, 0xEE, 0xFF, 0xC0};
memcpy(my_bdaddr.addr, &my_new_address, sizeof(my_new_address));
ble_gap_address_set(&my_bdaddr, 0);
Note
Notice that the new address is provided in reverse order. The resulting address will be C0:FF:EE:C0:FF:EE
Using the SmartBond™ Scanner smartphone app, we can verify that the address has changed:
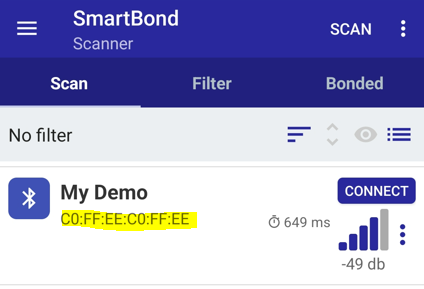
Figure 4 The Bluetooth Device Address has changed to C0:FF:EE:C0:FF:EE.
Note
The screenshot above is from an Android phone. The address will not be displayed if you are using an iOS device.
If you do not have access to an Android device, you can instead use a built-in feature of the Chrome and Edge web browsers.
Type chrome://bluetooth-internals/#devices into the address field of the browser and click “Start Scan”.