2. Running Secure FW Images
This section describes all the steps required to run secure application images. It also gives hints and insights on how to verify the correctness of the flashed secure FW image.
2.1. Generating Product Header Settings
On top of the FW Image a special section, namely Product Header, is appended. This special area always occupies the first 0x2000 bytes of the FLASH device. It mainly contains
information on the FLASH device used as well as the physical addresses of the application images. All contents of Product Header should be stored in a dedicated XML file.
To generate the aforementioned configuration file follow the steps below:
Run the
program_qspi_configexternal tool from e2 studio.

Figure 39 Generating Product Header - Running External Tool
Note
If the configuration file already exists, a window with the current Product Header settings will be displayed. Select either Change to modify the current settings or or click Keep to keep the current configuration values.
In the pop-up window select the target family of devices and then click OK. That should be the DA1469x-00.

Figure 40 Generating Product Header - Selecting Target Device
In the displayed window select the FLASH device used and then click OK. Note that, the default FLASH device in the DA1469x SDK is the MX25U3235F as, it is the one used by all DA1469x Development Kits.

Figure 41 Generating Product Header - Selecting Target Device
Next, you will be prompted to define the address where the
Active FW Imagein stored in the Non-Volatile memory. Using the default SDK configurations, this location should point to 0x2000, that is, right after the location ofProduct Header.

Figure 42 Generating Product Header - Selecting FW Image
To find out where the Active FW image is located, go to /sdk/config/partition_table.h (1) and check which partition table is utilized (2).
Open the corresponding file and check the value of NVMS_FIRMWARE_PART_START (3).

Figure 43 Generating Product Header - Partition Table
Finally, you will be asked to define the location of the
Updated FW Image. Even if the project has SUOTA functionality enabled, since this is the FLASH programming from the tool, we set the same address value for bothUpdated FW ImageandActive FW Image.

Figure 44 Generating Product Header - Selecting FW Image
If all above steps are executed successfully, the program_qspi.xml file should now be generated in the script’s location, that is /utilities/python_scripts/qspi/.

Figure 45 Generating Product Header - XML File
2.2. Building Binary Application
Once the product keys are generated and burned in OTP and the secure boot feature is enabled, the device can only run encrypted and signed application
images. For demonstration purposes import the pxp_reporter sample code found in the SDK and execute the following steps:
Build the target application code by employing either the DA1469x-00-Release_QSPI or DA1469x-00-Debug_QSPI build configuration.

Figure 46 Building Binary Application - Building Application
Once the building process is complete run the
secure_img_prog_xxxexternal tool. There are two flavors for running the tool, either by employing the serial port or JTAG interface.

Figure 47 Building Binary Application - Running External Tool
The aforementioned tool is responsible for the following:
The application image is encrypted using a valid symmetric key. Which product key is used for encrypting the FW image is defined in
secure_cfg.xml
Note
The same key is used for decrypting the application image.
A digital signature is generated based on the application image and a valid private key. This signature is used by the booter to verify the validity of the FW image before running it. Which product key is used for generating the digital signature is defined in
secure_cfg.xml
Note
The corresponding public key will be used for authenticating the signed application image.
Two special sections namely
Product HeaderandImage Headerare generated based onprogram_qspi.xmlandsecure_cfg.xmlrespectivelyIf all above steps are executed successfully the generated FW Image is downloaded in to the FLASH device
Press the RESET button on the ProDev Kit in order for the device to start running the application image.
Install the Renesas Smartbond App:

Figure 48 |SmartBond (TM)| App
Check with the Renesas Smartbond App if the Proximity Reporter is advertising:

Figure 49 Building Binary Application - SmartBond Scanner
2.3. Verifying Secure Image
Once the encrypted and signed application image is downloaded into the FLASH device, one can inspect the contents of Image Header as well as Product Header.
There are two main methods for accessing the FLASH device; the first option is via SmartSnippets Toolbox and the second option is through the CLI programmer tool.
For this tutorial, the former option is demonstrated. To do so, follow the steps below:
Open the SmartSnippets Toolbox.
Choose the right device (DA1469x-00) in the Board Tab:
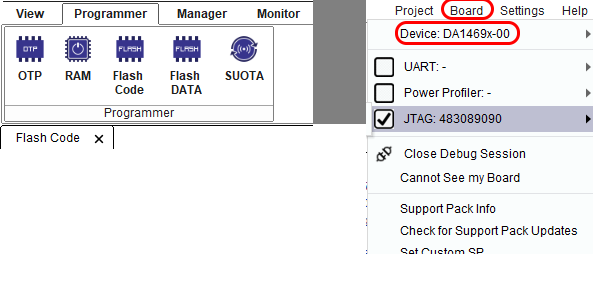
Figure 50 Flash Code from QSPI flash
Choose JTAG or UART interface to communicate to the Board.
Pick Flash Code.
Change the End Address (Hex) to 0x00002100.
Click Connect (When serial interface is used, a reset button may be pressed)
Click Read.
The first 0x2100 bytes from the flash will be read:
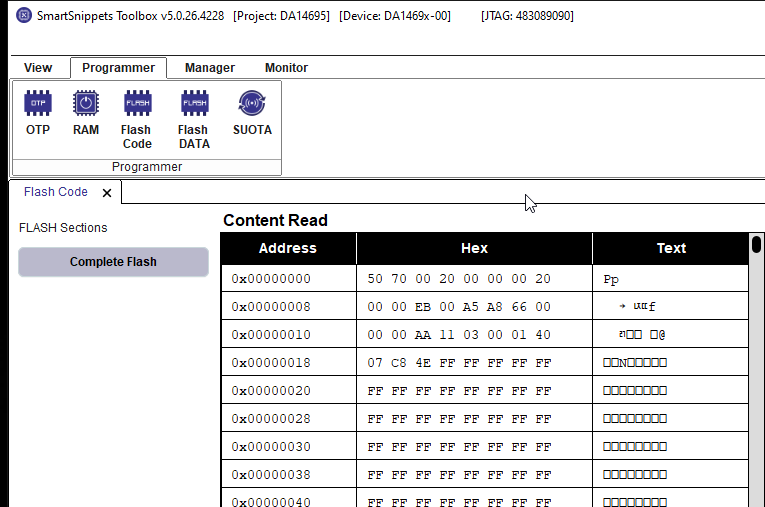
Figure 51 Flash Code
The bytes read from the flash can be checked against the Flash Regions and Layout
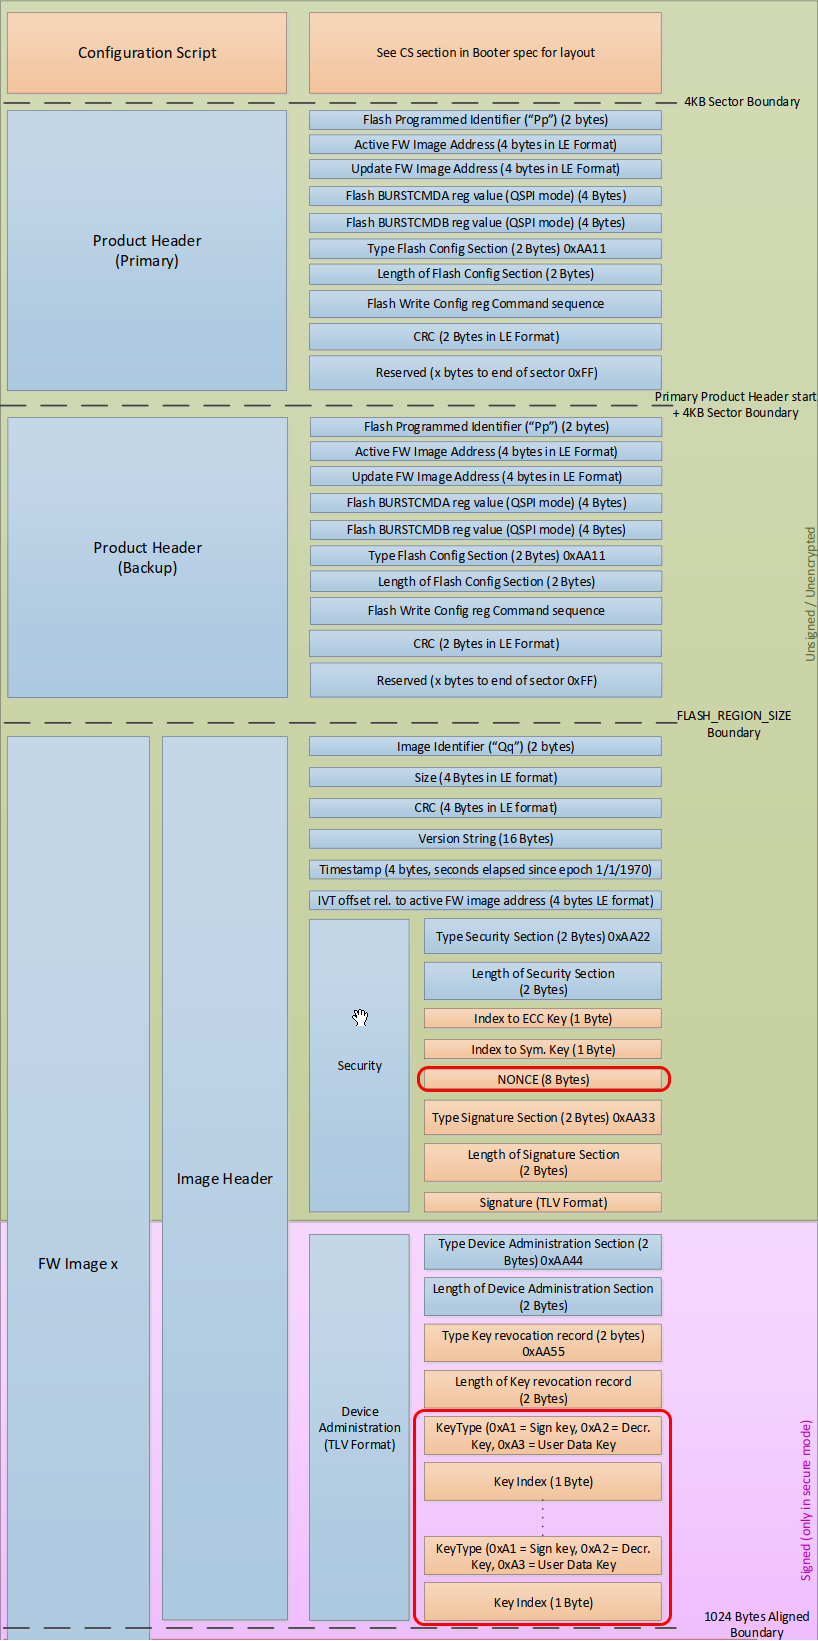
Figure 52 Flash Regions and Layout
Note
If there are no product keys revoked, the Length of Device entry part of Device Administration should be set to zero.
Note
Accessing the device is not possible once the SWD port as well as Development Mode are disabled.
The following two pictures illustrate the FLASH memory layout after flashing an application image:

Figure 53 Verifying Secure Image - Product Header Layout

Figure 54 Verifying Secure Image - Image Header Layout
2.4. Generating Secure SUOTA Image
A secure SUOTA image is a binary file, with a proper header appended on top of the application image, that is encrypted and signed. This secure image can be sent to
a target device from an Android or iOS device. To prepare a secure SUOTA image the mkimage.py script should be invoked. The script requires the following input
parameters:
The location of
product_keys.xml.The location of
secure_cfg.xml.The location of
sw_version.hThe location of the binary file itself.

Figure 55 Generating Secure SUOTA Image - Python Script
Running a script via a terminal/serial console can be quite tricky, especially if the input parameters required are lengthy. Currently, e2 studio does not provide any external tool/launcher that can be used to generate the secure SUOTA image quickly and safely. This section provides the steps required to create a new external tool intended to produce secure SUOTA images. To do so, execute the following steps:
In the e2 studio go to External Tools Configurations…

Figure 56 Generating Secure SUOTA Image - Opening External Tool Configurations
In the External Tools Configurations window, select New launch configuration.

Figure 57 Generating Secure SUOTA Image - Creating External Tool Instantiation
Once the new Instantiation is created, configure all parameters as illustrated below:

Figure 58 Generating Secure SUOTA Image - Configuring External Tool Instantiation
Below is the script invoked to create a secure SUOTA image along with its input parameters:
"mkimage.py" "${project_loc}/${config_name:${project_name}}/${project_name}.bin"
"--sw_version"  "${project_loc}/sw_version.h"
"--prod_id" "DA1469x-00"
"-s"  "${scripts_loc}/secure_image/secure_cfg.xml"
"--prod_keys"  "${scripts_loc}/secure_image/product_keys.xml"
In the External Tools Configurations window, click Variables… (1).
In the Select Variable window, click Edit Variables… (2).

Figure 59 Generating Secure SUOTA Image - Editing Variables
In the Preferences window, click New (3).

Figure 60 Generating Secure SUOTA Image - Declaring New Variables
Note
Make sure that configName match the selected build configurations. For instance, DA1469x-00-Release-QSPI or DA1469x-00-Release-QSPI-SUOTA. If this is not the case, select the aforementioned variable and then click Edit… to change its value.
In the New String Substitution Variable window, give an name (4) for the new variable as illustrated below:

Figure 61 Generating Secure SUOTA Image - Assigning Variable Name
Click Browse… (5) and search the location of the
python_scriptsproject. Once the file is selected, click OK (8).

Figure 62 Generating Secure SUOTA Image - Assigning Variable Value
The newly declared variable should now be displayed in the String Substitution section part of the Preferences window. To continue select OK. (9)
In the Select Variable window click OK (10).
In the External Tools Configurations window, switch to the Build area and unclick Build before launch.

Figure 63 Generating Secure SUOTA Image - Configuring Build Settings
In the External Tools Configurations window, switch to the Common area and select the following:

Figure 64 Generating Secure SUOTA Image - Configuring Common Settings
In the External Tools Configuration window, select Apply (11) and then Close (12).
The newly created launcher should now be visible in the external tools section.

Figure 65 Generating Secure SUOTA Image - Verifying External Tool Generation
Note
The sw_version.h file should be placed under the main application’s path. In addition, both secure_cfg.xml and product_keys.xml should be placed in
/utilities/python_scripts/secure_image/. If any of the above files are located at a different path, the input parameters of the external tool should be
changed accordingly.
Run the launcher and verify that the secure SUOTA image is generated under the DA1469x-00-xxx-QSPI-xxx folder’s path. The suffix of the new FW image name should match the SW_VERSION macro declared in
sw_version.h. For instance,freertos_retarget.1.0.0.1.bin.

Figure 66 Generating Secure SUOTA Image - Verifying Secure SUOTA Image