3. Burning the OTP in production
This section describes how the generated keys can be programmed into the DA1469x Device Under Test (DUT) during the production process. To do this, the Renesas Production Line Toolkit (PLT) will be used, more info about the PLT can be found on the product page.
3.1. Obtaining the Keys
The keys which were generated in the previous steps of this manual can be obtained from product_keys.xml.

Figure 67 Obtaining Decryption Keys
Warning
The data in product_keys.xml has to be byte swapped if it is programmed using the PLT.
3.2. Obtaining the Encrypted Binary File
There are multiple ways of obtaining the encrypted binary file. But one of the easiest is to use SmartSnippets Toolbox to read the flash after it was programmed in Building Binary Application. The goal is to configure your development platform in SmartSnippets Toolbox (1), read the complete flash of the development platform (2), write this to a file (3), and later program this into each device in production (4).
To configure your development platform, refer to the ‘Getting Started’ chapter of the SmartSnippets Toolbox manual .
To read the complete flash, refer to the ‘Flash Code’ chapter of the SmartSnippets Toolbox manual .
To write the memory to a file, refer to the ‘Flash Code’ chapter of the SmartSnippets Toolbox manual note the option “Export to File” and “export the entire flash”.
To set up the PLT for programming a flash memory, refer to Programming Flash
3.3. PLT Configuration
3.3.1. Programming Flash
To setup the PLT for programming flash memories, the ‘QSPI Flash’ section of the ‘Memory Functions’ tab is used from the PLT configuration GUI. After the ‘Write enable’ checkbox is checked, the application binary can be selected from the filesystem.

Figure 68 PLT QSPI Flash Settings
3.3.2. Programming Keys
To setup the PLT for programming keys in the OTP, the ‘Custom Memory Data’ section of the ‘Memory Header’ tab is used from the PLT configuration GUI. After the ‘Write enable’ checkbox is checked, the csv file containing the keys can be selected.
To program a multiple OTP fields (signature keys. decryption keys, and encryption keys) in using the PLT, a csv file must be used as the data source. The format of the csv file is described in the PLT manual section 6.10.1 but a template that is specific to secure boot can be downloaded here. The template has the following programming actions pre-configured:
OTP 0x100808C0: Signature Keys
OTP 0x10080B00: QSPI FW Decryption Keys
OTP 0x10080A00: User Data Encryption Keys
The keys obtained in Obtaining the Keys have to be byte swapped and placed in this csv file. So, for example this is how to move from the xml to the csv:
- product_keys.xml: <symmetric_key> 77EFE1B37051B4C1DA87A48903012ADAAE9D24A1DB1B1861183534E987D4E004 </symmetric_key>
- CSV: B3E1EF77C1B4517089A487DADA2A0103A1249DAE61181BDBE934351804E0D487
- product_keys.xml: <symmetric_key> 2F40170C1C8DED3FCAE9191CEFE9A9C9D6E0093377EA0128541EFBA1041C01CC </symmetric_key>
- CSV: 0C17402F3FED8D1C1C19E9CAC9A9E9EF3309E0D62801EA77A1FB1E54CC011C04
- product_keys.xml: <public> D8D3FB4FBDCF99FCC75F5BC22FAAC6628B976A54AEE51E48E08026F13E2B2386 </public>
- CSV: 4FFBD3D8FC99CFBDC25B5FC762C6AA2F546A978B481EE5AEF12680E086232B3E
After inserting the (byte swapped) keys in the csv file, the csv file must be selected in the ‘Custom Memory Data’ section of the ‘Memory Header’ tab:
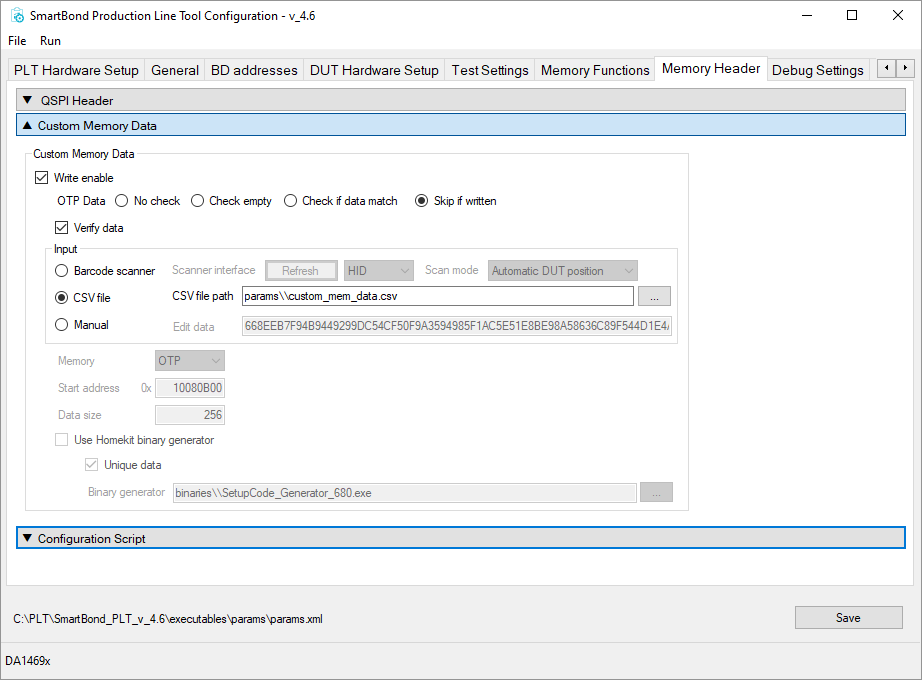
Figure 69 PLT Settings for programming keys using a csv file
3.3.2.1. Static keys in csv file (optional)
In order to program the same set of keys in each DUT, one line would have to be inserted in the csv file for each DUT (identified by its BD address). Since this is a lot of redundant work if all keys need to be the same, a script was created to update the BD addresses in the csv file before each PLT test run. The script can be downloaded here and it should be placed inside SmartBond_PLT_v_4.6\executables\scripts and can be enabled in the ‘Test Options’ section of the ‘General tab’ like illustrated in Figure 70. When using the automation script, the keys must be defined at the start of the script.
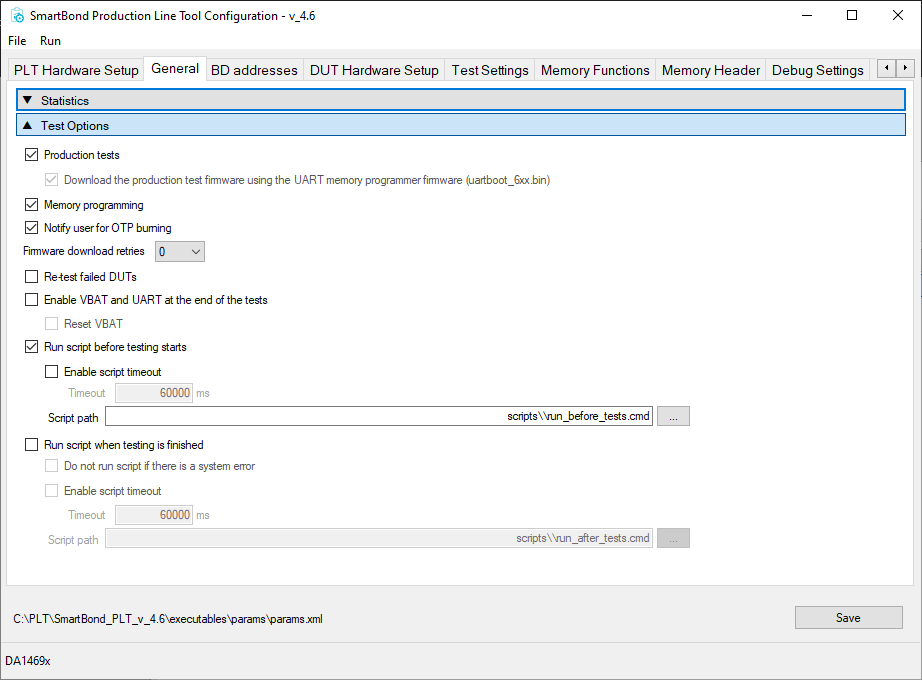
Figure 70 PLT Settings for enabling csv update script
3.3.3. Configuration Script Entry
To enable secure boot, the secure boot register (0x500000CC) has to be written using the configuration script. To do this using the PLT, the ‘Configuration Script’ section of the ‘Memory Header’ tab is used. After the Configuration script ‘Enable’ checkbox is checked, the ‘Register Configuration section’ can be enabled using the checkbox and the contents can be written:
‘Configure script register address.’ = 500000CC (this is the DA1469x SECURE_BOOT_REG)
‘Configure script register value.’ = 00000001 (this is the DA1469x SECURE_BOOT enable bit)
Note
Please note that the register value of 0x500000CC might not be 00000001 in all cases. Sometimes, other fields of the register should be used as well. Please refer to the datasheet <https://www.renesas.com/us/en/document/dst/da1469x-datasheet#page=677 to check what are the other fields in this register.
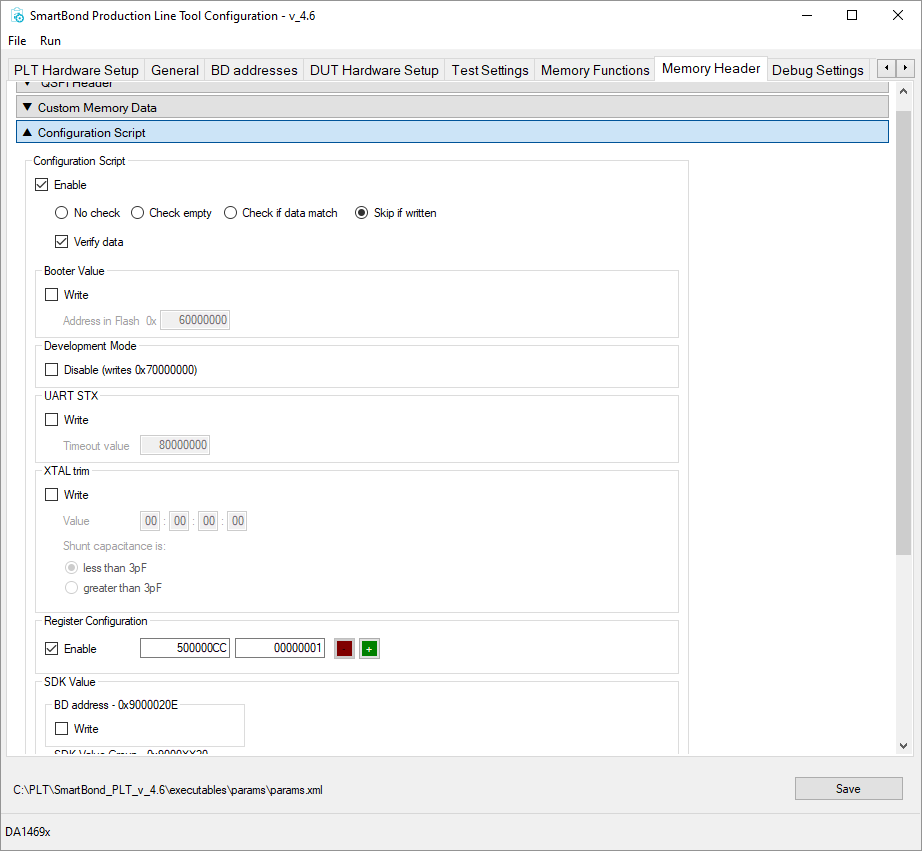
Figure 71 PLT Settings for enabling secure boot
The PLT is now configured to program the keys in the OTP and enable secure boot in the configuration script. Don’t forget to enable ‘Memory programming’ in the ‘General’ tab.