8. Appendices
8.1. Appendix A: Using the Pro Development Kit
The user_periph_setup.h file contains hardware settings related to the Development Kit used. The default is the ProDev Kit.

Figure 28 Hardware Settings for Pro Development Kit
8.2. Appendix B: Latency Timer of the FTDI cable
If an external FTDI cable is used to burn the OTP (or to download the image into the external memory), the latency timer of the FTDI cable has to be changed from 15 ms to <10 ms.
To change the latency timer:
In the Windows Device Manager, expand the list of COM ports.
Right click on the required COM port and select Properties.
In the Port Settings tab, click Advanced.
Set the Latency Timer to < 10 ms.
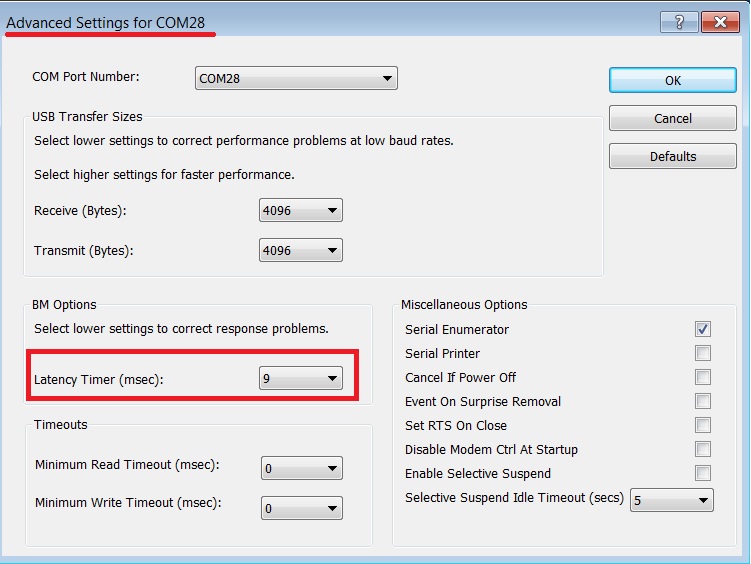
Figure 29 FTDI Latency Timer
8.3. Appendix C: Battery Connection ‘Workaround’
There is a small hardware malfunction; when the board operates on battery (J11 jumper on 2-3), the RST signal is permanently high.
When USB is disconnected, T_RESET becomes low and the invertor U7 RST is high. This prevents the board from operating.
The workaround is to dismount R84, see Figure 30.
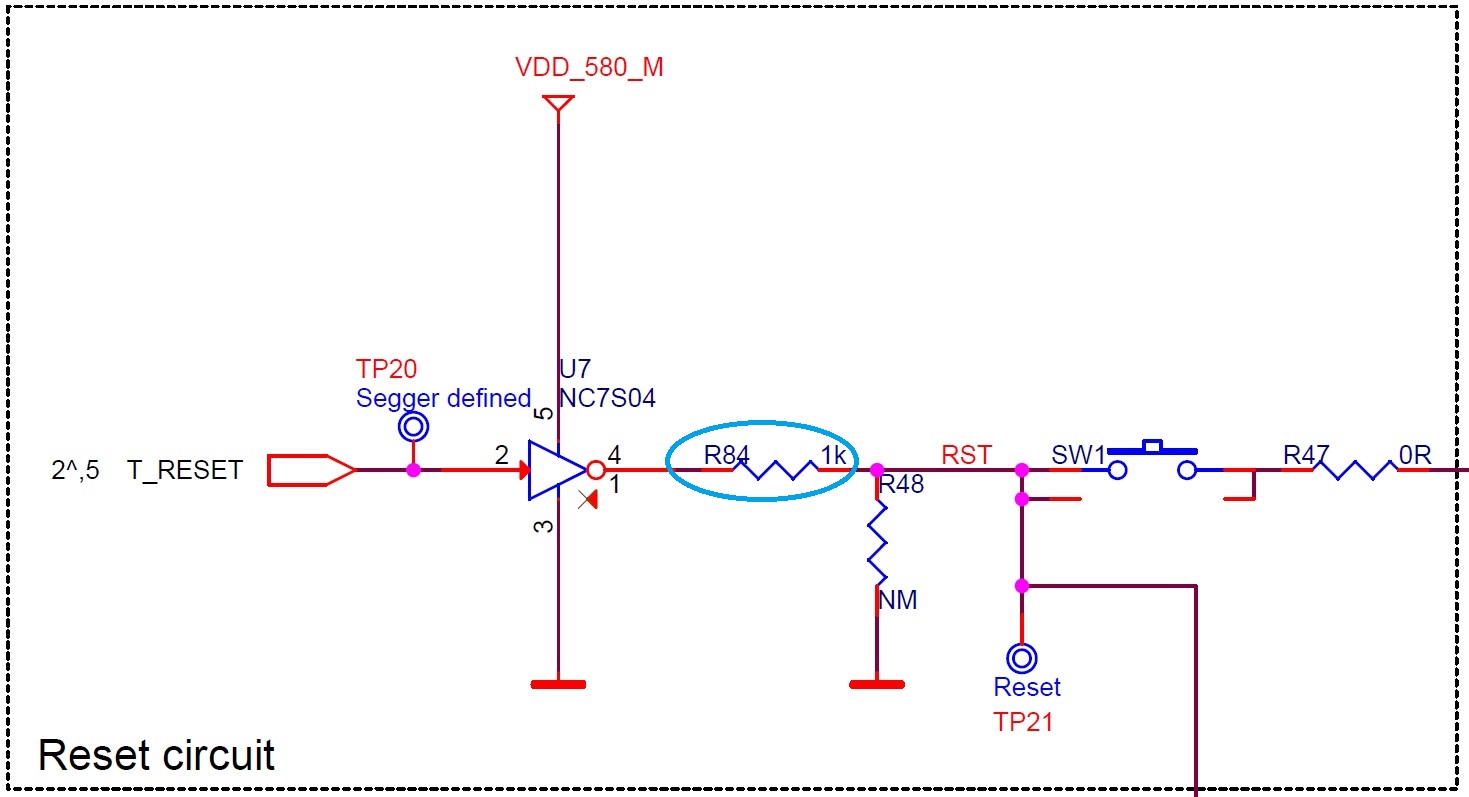
Figure 30 Reset Circuitry to Dismount R84

Figure 31 R84 Location
8.4. Appendix D: Power Bouncing Workaround
DA14585/586 daughterboards are supplied from the motherboard through a jumper in header J11. See the 3V3 Generation and battery selection for DA14580 and Peripherals section in the DA14585/586 DEVKT-Pro MAINBOARD Electrical Schematic.
Inserting this jumper when the daughterboard is mounted on the motherboard may cause bouncing issues. Α hardware workaround is implemented on DA14585 and DA14586 QFN40 daughterboards.

Figure 32 DA14585/586 QFN40 Daughterboard (321-10-x)
8.5. Appendix D:SmartSnippets™ Studio
8.5.1. SmartSnippets™ Introduction
Dialog SmartSnippets™ Studio is a royalty-free software development platform for Smartbond™ devices. It fully supports the DA1458x family of devices.
For the DA14585/586, KEIL must be used for compilation and debug instead of using the supplied SmartSnippets GNU ARM GCC. KEIL needs to be installed separately (it is not included).
For the SmartSnippets™ Package you need only to install the SmartSnippets™ Toolbox which contains:
SmartSnippets™ Toolbox which covers all software development requirements, including:
programming and loading of firmware into SRAM, OTP, and Flash
power profiling
SmartSnippets™ Toolbox documentation
The SmartSnippets™ IDE is enabled by an on-board J-Link debugger from SEGGER. This offers standard debug capabilities such as single stepping, setting breakpoints, software download and many more. For more details on the debugger capabilities, visit https://www.segger.com/.
8.5.2. SmartSnippets™ Installation
For further reading The installation procedure for SmartSnippets™ Studio is described in detail in UM-B-057 SmartSnippets Studio User Manual.
Note
Registration is required in order to download the SmartSnippets™.
Warning
Please be aware that if you have an Antivirus software is installed in your machine, it could slow down the SmartSnippets™ installation due to the scan.
A summary of the steps is given here.
Download the latest version of SmartSnippets™ Studio from Development tools.
Run the SmartSnippets™ Studio installer (
.msi). Several of the required tools are automatically installed, others need to be manually downloaded and installed.Select to install the latest version of SEGGER J-Link GDB server and click Next.
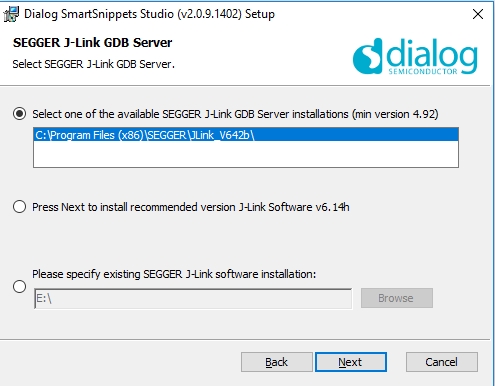
Figure 33 Automatically Install J-Link
Select the destination folder for the SmartSnippets™ Studio and click Next.

Figure 34 Select SmartSnippets™ Studio Install Directory
The SmartSnippets™ Studio is installed.
Note
The default Windows installation folder for SmartSnippets™ Studio is
C:\DiaSemi.When Windows Defender is turned ON it will prevent the file SmartSnippets™ Studio installer (
.msi) from automatically running, click Run Anyway when prompted.Administrator access is required to install SmartSnippets Studio software components.