5. Launch e2 studio and create the application (Free RTOS)
5.1. create the Renesas CC-RX C/C++ Executable Project
In this section, we will outline the necessary steps to build an application based on FreeRTOS. While many steps overlap with those outlined in Section 4, we will focus primarily on the differences.
Follow steps 1 through 4 as outlined in the previous section Section 4.
Step 5 - Create a new e2 studio project with the following settings and then click next
Renesas CC-RX C/C++ Executable Project
Project name: (Arbitrary)
FreeRTOS (kernel only)
Target Board: CK-RX65N
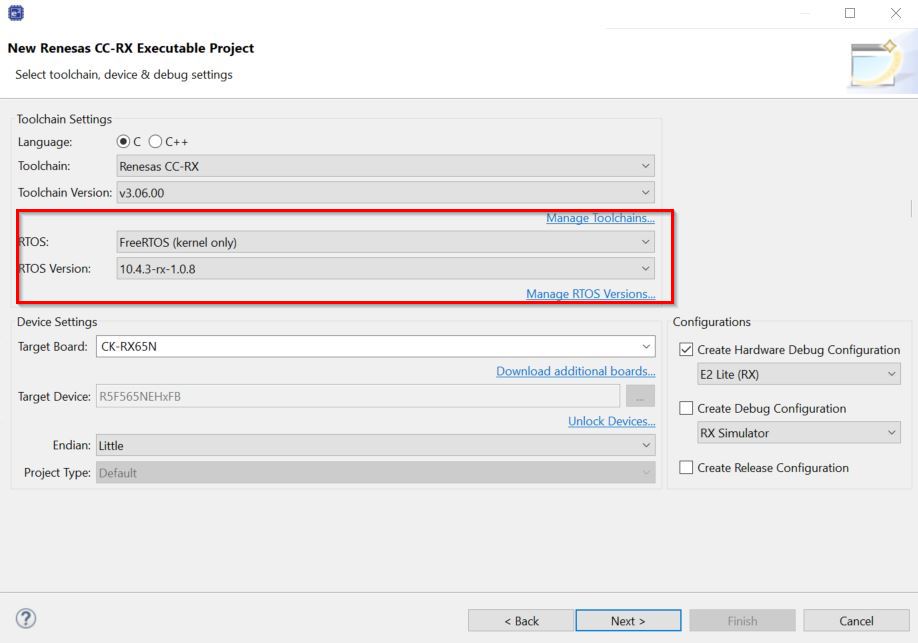
Figure 45 FreeRTOS RX Project
Follow steps 6 through 11 as outlined in the previous section Section 4.
Step 12 - We will add the GPIO driver FIT module (instead of the PORT Module).
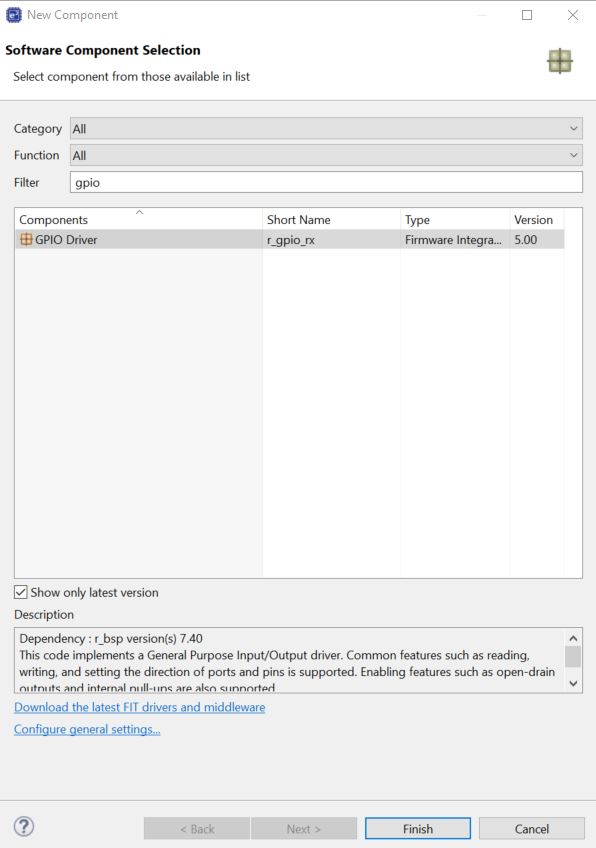
Figure 46 Add GPIO driver component
Step 13 - Below an overview of the necessary FIT modules to built the FreeRTOS application.
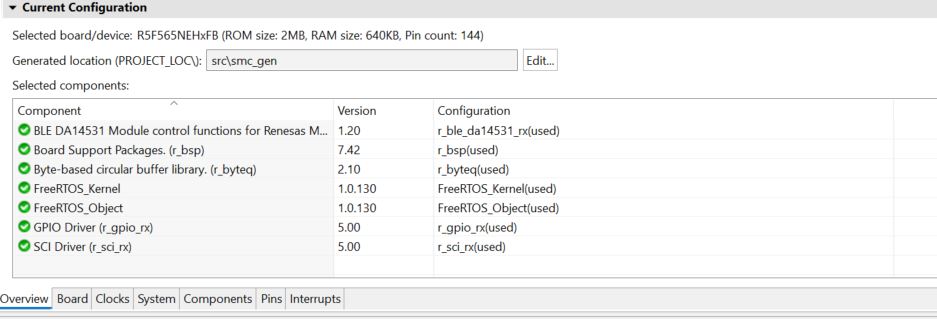
Figure 47 FIT modules to built the FreeRTOS application
Step 14 - Add the BLE thread. Click on FreeRTOS_object and then Tasks tab. When using FreeRTOS ensure the heap 4 size is set to a minimum of 2K bytes. Here we set to 2048 bytes
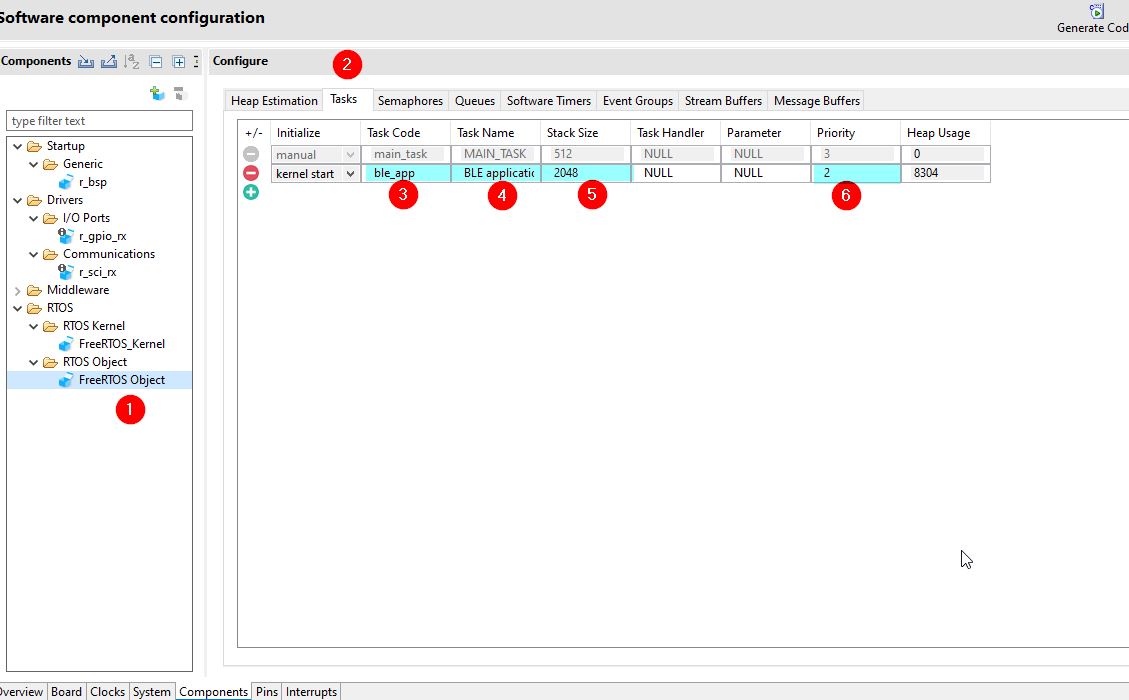
Figure 48 BLE Thread config
Step 15 - Ensure that that the Total heap size is set to 128.
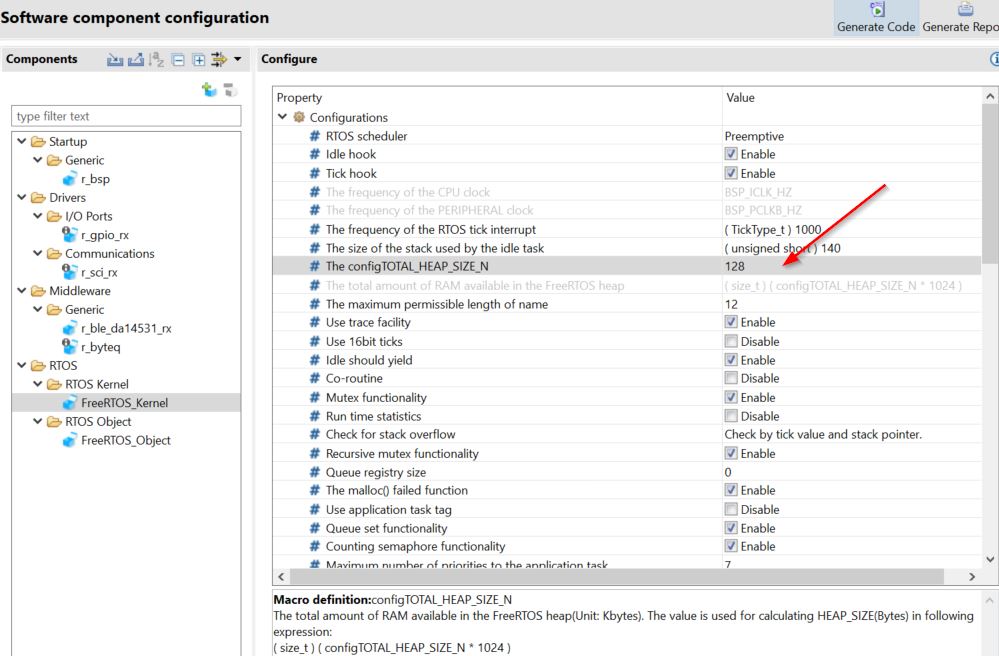
Figure 49 HEAP_SIZE_N config
Step 16 - Ensure the BSP heap size is set to at least 2K bytes.
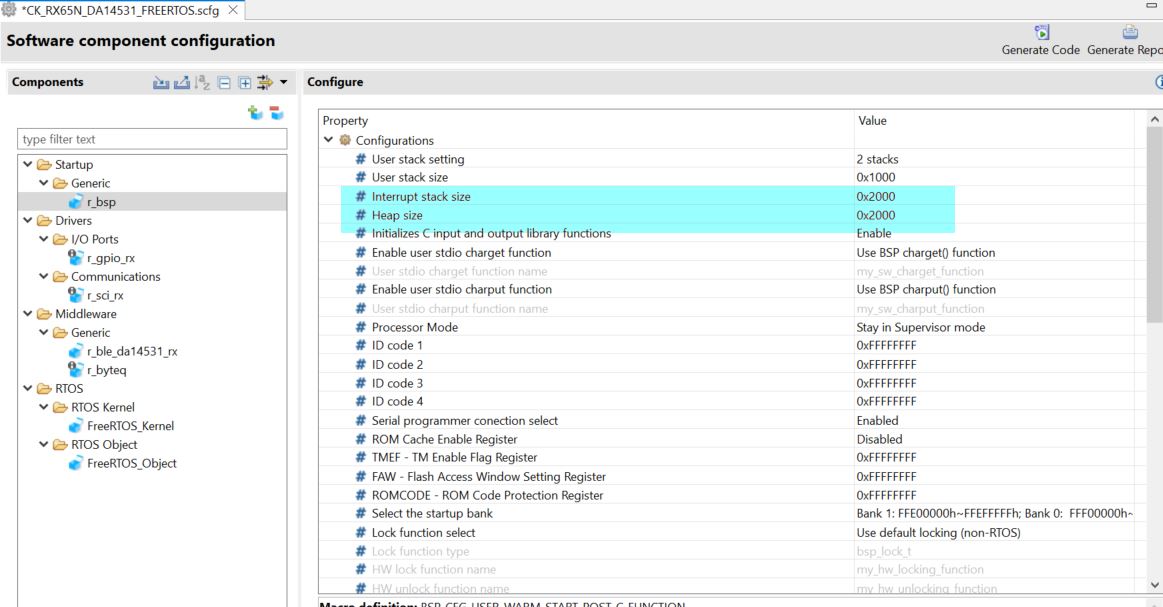
Figure 50 BSP heap size
Step 17 - Update the clock tree as it shown in Figure 26 and then Generate code for your project.
Figure 51 FreeRTOS project generate code
5.2. Source Code Modifications
This section steps through adding an application layer to the code generated by the smart configurator. The code we will insert is simple but would be the foundation for building out your entire project.
Step 18
Add a call to
app_mainto the file src[Project name].cCK_RX65N_DA14531_FREERTOS.cfile.
/***********************************************************************
*
*  FILE        : CK_RX65N_DA14531_FREERTOS.c
*  DATE        : 2024-04-08
*  DESCRIPTION : Main Program
*
*  NOTE:THIS IS A TYPICAL EXAMPLE.
*
***********************************************************************/
#include "FreeRTOS.h"
#include "task.h"
#include "r_smc_entry.h"

#if BSP_CFG_CPLUSPLUS == 1
extern void abort(void);
#endif
extern void app_main(void);
void main_task(void *pvParameters)
{

    /* Create all other application tasks here */

    app_main();

    while(1) {
        vTaskDelay(10000);
    }

    vTaskDelete(NULL);

}

#if BSP_CFG_CPLUSPLUS == 1
void abort(void)
{

}
#endif
Note
In this step, first, you need to ensure that the file qe_gen\ble\app_main.c has been generated.
The QE profile generation process remains identical to what was described in Section 4.2. There are no differences in this aspect between building a bare metal application and one based on FreeRTOS.
Step 19
In the file
qe_gen/ble/app_main.c, Add include forr_gpio_rx_if.h
/******************************************************************************
 User file includes
*******************************************************************************/
/* Start user code for file includes. Do not edit comment generated here */
#include "r_gpio_rx_if.h"
/* End user code. Do not edit comment generated here */
Step 20
Update the
ble_init()in theapp_mainfunction as below, this will toggle the Red LED on the DA14531 PMOD when BLE and profiles are Initialized.
/* Initialize BLE and profiles */
   if (BLE_SUCCESS == ble_init())
   {
       R_GPIO_PinDirectionSet(GPIO_PORT_B_PIN_7, GPIO_DIRECTION_OUTPUT);
       R_GPIO_PinWrite(GPIO_PORT_B_PIN_7, GPIO_LEVEL_HIGH);
   }
   else
   {
       R_GPIO_PinDirectionSet(GPIO_PORT_2_PIN_5, GPIO_DIRECTION_OUTPUT);
       R_GPIO_PinWrite(GPIO_PORT_2_PIN_5, GPIO_LEVEL_LOW);
   }
Step 21
- Update the evkioctrls_cb() callback as below:
 static void evkioctrls_cb(uint16_t type, ble_status_t result, st_ble_servs_evt_data_t *p_data)
{
/* Hint: Input common process of callback function such as variable definitions */
/* Start user code for RX65N IO Control Server callback function common process. Do not edit comment generated here */
       uint8_t Level;
       R_GPIO_PinDirectionSet(GPIO_PORT_2_PIN_2, GPIO_DIRECTION_OUTPUT);
      /* End user code. Do not edit comment generated here */

    switch(type)
    {
/* Hint: Add cases of RX65N IO Control server events defined in e_ble_evkioctrls_event_t */
/* Start user code for RX65N IO Control Server callback function event process. Do not edit comment generated here */

       case BLE_EVKIOCTRLS_EVENT_LEDCTRL_WRITE_REQ:
           if (BLE_SUCCESS == result)
           {
            Level = *(uint8_t *)p_data->p_param;
               if(Level == 0x00)
               {
                   R_GPIO_PinWrite(GPIO_PORT_2_PIN_2, GPIO_LEVEL_HIGH);
               }
                       else
               {
                   R_GPIO_PinWrite(GPIO_PORT_2_PIN_2, GPIO_LEVEL_LOW);
               }
           }
           break;
       case BLE_EVKIOCTRLS_EVENT_LEDCTRL_READ_REQ:
           if (BLE_SUCCESS == result)
           {
            Level = R_GPIO_PinRead(GPIO_PORT_2_PIN_2);
               R_BLE_EVKIOCTRLS_SetLedctrl(&Level);
           }
           break;
       default:
           break;


       /* End user code. Do not edit comment generated here */
    }
}
Step 22
Under
src/frtos_skeletonupdate the ble_app function as below:
#include "task_function.h"
/* Start user code for import. Do not edit comment generated here */
#include "r_gpio_rx_if.h"
#include "rm_ble_abs.h"

extern void app_main(void);
/* End user code. Do not edit comment generated here */

void ble_app(void * pvParameters)
{
/* Start user code for function. Do not edit comment generated here */
   app_main();
/* End user code. Do not edit comment generated here */
}
/* Start user code for other. Do not edit comment generated here */
void abort(void)
{

}
/* End user code. Do not edit comment generated here */
Step 23
As the
ble_apptask is created in theble_app.c, comment out the following code infreertos_start.c
    /************** task creation ****************************/
    /* Main task. */
/*    ret = xTaskCreate(main_task, "MAIN_TASK", 512, NULL, 3, NULL);
    if (pdPASS != ret)
    {
        while(1)
        {
             Failed! Task can not be created.
        }
    }*/