Using the PTX105R Arduino Shield
The PTX105R Arduino Shield works with the Arduino Uno R4 Minima and WiFi boards, using either SPI, I2C or UART. Each interface has its own library, which supports reading basic card information like protocol type and ID, reading and writing NDEF messages and card emulation.
The Shield
The shield can be directly connected to the Arduino board. The desired interface can be selected by configuring the jumper caps, as indicated on the top side of the shield:
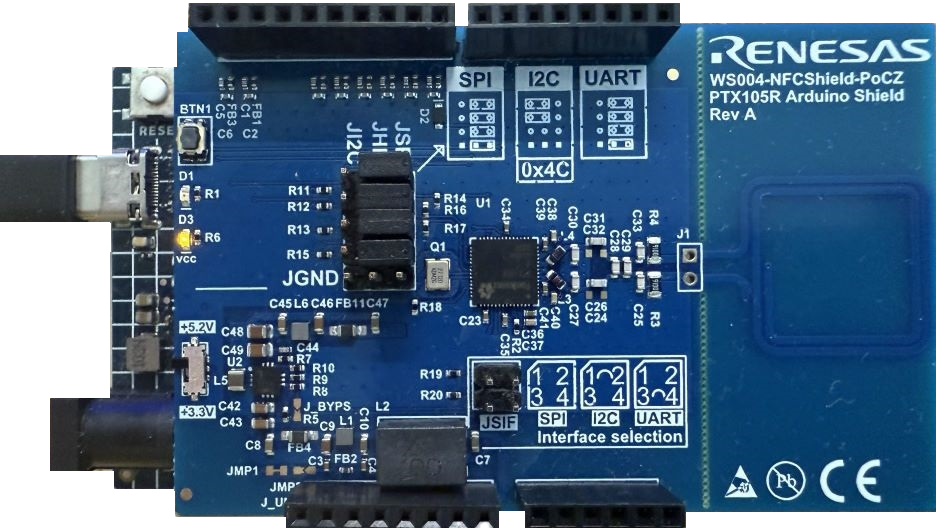
A switch makes it possible to select either 3.3V or 5.2V for transmit power. Selecting a higher voltage increases the field strength and thereby the distance at which a card can be activated.
The Reader Library
There is a dedicated library for SPI, I2C and UART, which only differ in the interface-specific implementation. The library uses the NON-OS IOT Reader SDK, making it simple to poll for cards, read IDs and other basic information, read and write NDEF messages to and from NDEF-formatted cards, and emulate a Type-4 tag containing and NDEF message. It does not expose all features and functionality provided by the SDK.
The library supports polling for RF-technologies of Type A, B, F and V and it supports card protocols of Type 2, 3, 4 and 5.
Installing the Library
The library for each interface can be added form the Arduino IDE’s library manager. Keep in mind, that interfaces are exclusive: only one of them can be installed at a time. If a library interface is already installed, it has to be removed before installing a different one. Compiling sketches using the library will fail otherwise.
Initialization and Deinitialization
The reader can be initialized as shown below:
IotReader::getReader().begin();
IotReader::getReader() returns a reference to the singleton reader instance and begin() initializes the SDK and the internal card registry.
The end() function puts the reader into idle mode, which means it will stop polling and it deinitializes the SDK.
In case of success, both functions return true.
Polling
Polling can be configured as shown below:
// Configure polling for type A, B, F and V types
// with 500 ms idle time between cycles
// Low Power Card Detection enabled with regular polling at every 10th cycle
// and stand-by mode enabled
const PollingConfig pollConfig = {.pollTypeA = 1U,
                                  .pollTypeB = 1U,
                                  .pollTypeF212 = 1U,
                                  .pollTypeV = 1U,
                                  .idleTime = 500U,
                                  .discoverMode = 10U,
                                  .enableStandBy = 1U};
pollTypeA- polling for type-A cards -1: enabled,0: disabledpollTypeB- polling for type-B cards -1: enabled,0: disabledpollTypeF212- polling for type-F cards at 212 Kbps -1: enabled,0: disabledpollTypeV- polling for type-V cards -1: enabled,0: disabledidleTime- the period in milliseconds between polling cycles, when the system is in a low-power state, waiting for card detection. It can be adjusted according to the anticipated frequency of card presentation.discoverMode- configure polling mode (regular, Low Power Card Detection, hybrid), please refer to the section Low Power Card Detection belowenableStandBy- if Low Power Card Detection is used, it is recommended to enable -1: enabled,0: disabled
Polling can be initiated by calling detectCard() and providing the polling configurations to it.
In case a card is activated, it returns true.
IotReader::getReader().detectCard(pollConfig);
Low Power Card Detection
Low Power Card Detection (LPCD) is a feature of the NFC chip that allows the reader to detect cards while conserving energy. This is achieved by intermittently powering down the reader and only activating it periodically to check for the presence of a card. If no card is detected, the reader returns to a low-power state.
LPCD can be configured by discoverMode:
0= Regular Polling1= Low Power Card Detection (LPCD)2-255= LPCD with every n-th cycle Regular Polling
If LPCD is used, enabling enableStandBy is recommended.
Retrieving Basic Card Information
Information about the active card (RF-technology, protocol type, card ID) can be retrieved by calling getCardInfo().
The information can be nicely printed to the serial monitor by calling printCardInfo(), for which Logging.h must be included:
printCardInfo(IotReader::getReader().getCardInfo());
Card information will be printed by printCardInfo() on the serial monitor as shown below:
Card found
ID: 7 bytes
(0x) 04 E5 DB 01 14 3A 03
RF-technology: Type-A
Protocol: Type-2
Reading NDEF Messages
Reading NDEF messages is only supported for NDEF formatted cards.
The library does not support formatting.
Reading can be done by calling ndefRead() with a vector parameter to hold the raw message.
This method returns true, if an NDEF message was found and read.
The raw message can then be parsed by getNdefMessage().
The information about the message type and the payload can be nicely printed to the serial monitor by calling printNdefMessage(), for which Logging.h must be included:
std::vector<uint8_t> messageBuffer;
if (IotReader::getReader().ndefRead(messageBuffer)) {
    // If an NDEF message was read, display it
    if (messageBuffer.size() > 0) {
        const NdefRecord message =
            IotReader::getReader().getNdefMessage(messageBuffer);
        printNdefMessage(message);
    }
} else {
    Serial.println("No NDEF record found");
}
If an NDEF message is found, it will be printed by printNdefMessage() on the serial monitor as shown below:
NDEF record found
Format: NFC Well-Known
Type: URI (U)
Value: https://renesas.com
Payload: 12 bytes
(0x) 04 72 65 6E 65 73 61 73 2E 63 6F 6D
Writing NDEF Messages
Writing NDEF messages is only supported for NDEF formatted cards.
The library does not support formatting.
Writing can be done by calling ndefWrite() with a vector parameter containing the raw message.
This method returns true, if the message was written successfully.
The following example writes the URL https://renesas.com:
const std::vector<uint8_t> message = {0xD1, 0x01, 0x0C, 0x55, 0x04, 0x72,
                                      0x65, 0x6E, 0x65, 0x73, 0x61, 0x73,
                                      0x2E, 0x63, 0x6F, 0x6D};

if (IotReader::getReader().ndefWrite(message)) {
    Serial.println("NDEF message written");
} else {
    Serial.println("Could not write NDEF message");
}
Each NDEF message consists of a record header and a payload. In the example above, the header consists of the 4 most significant bytes:
0xD1- Type Name Format + flags: the message is a Well-Known TNF and it’s a short record0x01- type length0x0C- payload length (decimal 12)0x55- record type: URI
The payload consists of the least significant 12 bytes:
0x04- URI prefix:https://the remaining 11 bytes are the ASCII-encoded characters for
renesas.com
For more information about the format of NDEF messages, please refer to external sources, like the book Beginning NFC published by O’Reilly Media.
Card Emulation
A Type-4 card with an NDEF message on it can be emulated by calling emulateCard():
// renesas.com using https
const std::vector<uint8_t> message = {0xD1, 0x01, 0x0C, 0x55, 0x04, 0x72,
                                      0x65, 0x6E, 0x65, 0x73, 0x61, 0x73,
                                      0x2E, 0x63, 0x6F, 0x6D};

IotReader::getReader().emulateCard(message);
Examples
There are 4 example sketches included:
NDEF Read
NDEF Write
Card Emulation
IOT Reader Demo
Configuring the Serial Monitor
In order to use the Arduino IDE’s built-in serial monitor for the examples, it has to be configured with the following settings:
Baud rate: 115200
New Line must be set

NDEF Read
This example reads NDEF messages from cards depending on the polling configuration.
If a card is activated, the RF technology, protocol type and ID are printed to the serial monitor.
If an NDEF message is found, the message type and the payload is also printed.
Information is printed in a loop as long as the card is kept inside the field.
If readOneByOne is true, a character must be sent from the serial monitor, in order to initiate the next reading cycle (make sure “New Line” is set).
How to use the example:
Open the Serial Monitor.
Approach the antenna with a card.
Information about the card and, if found, the NDEF message will be printed to the serial monitor. Reading several cards at the same time is not supported by the example.
Information is printed to the serial monitor as shown below:
Place a card on the antenna to read it.

Card found
ID: 7 bytes
(0x) 04 E5 DB 01 14 3A 03
RF-technology: Type-A
Protocol: Type-2
NDEF record found
Format: NFC Well-Known
Type: URI (U)
Value: https://renesas.com
Payload: 12 bytes
(0x) 04 72 65 6E 65 73 61 73 2E 63 6F 6D
NDEF Write
This example writes a hard-coded message to an NDEF formatted card. If a card is not properly NDEF formatted, the writing procedure will fail.
How to use the example:
Open the Serial Monitor.
Place a card on the antenna.
Observe the output on the serial monitor. Do not remove the card until the writing is finished, otherwise it might become corrupted.
After the card was written, remove it and place the next card on the antenna.
Type a character into the serial monitor and press Enter. Make sure “New Line” is set.
Observe the output on the console and repeat steps 3 to 5.
By default, the URL https://renesas.com is written.
It can be modified by changing the vector called message.
Information is printed to the serial monitor as shown below:
Place a card on the antenna and do not remove it, until it is written!

Card found
ID: 7 bytes
(0x) 04 E5 DB 01 14 3A 03
RF-technology: Type-A
Protocol: Type-2
NDEF message written

Place a card on the antenna and send a character to write it (New Line must be enabled).
Do not remove the card, until it is written!
Card Emulation
This example emulates a Type-4 tag with a hard-coded NDEF message.
How to use the example:
Open the Serial Monitor. Application data will be printed to the screen, which may be observed or ignored.
Place a reader or a phone on the antenna (NFC must be enabled) to read the NDEF message.
By default, the NDEF message https://renesas.com is stored.
It can be modified by changing the vector called message.
Reader Demo
This example runs the SDK’s reader demo application. It polls for all supported RF technologies and protocol types. It exchanges example data with the active card depending on the protocol.
How to use the example:
Open the Serial Monitor.
Approach the antenna with a card. Information about the card will be printed to the serial monitor. Activating several cards at the same time is not supported by the example.
Data exchanged with cards can be modified in the IotRdDemo.cpp file.
Card information and exchanged data is printed to the serial monitor as shown below:
IOT reader demo started
Card activated ... OK!
01. RF-Technology = Type-A; SENS_RES: 4400; NFCID1_LEN: 07; NFCID1: 04E5DB01143A03; SEL_RES: 00; Protocol: T2T
TX = 3000
RX = 04E5DBB201143A032C480000E1103E0000
Restarting RF-Discovery ... OK
Waiting for discovered Cards ...
Card activated ... OK!
01. RF-Technology = Type-A; SENS_RES: 4403; NFCID1_LEN: 07; NFCID1: 042A02E9730000; SEL_RES: 20; Protocol....: ISO-DEP; PPS1: 00; ATS: 067577810280
TX = 00A404000E325041592E5359532E444446303100
RX = 6A82
Restarting RF-Discovery ... OK