2. Debugging using serial port
In this section we see how to activate and use serial debug in DA1458x/DA1453x project step by step. For this demostration ble_app_profile example from the SDK project will be used.
2.1. Software Configuration
Open
../target_apps/ble_examples/ble_app_profile/Keil_5/ble_app_profile.uvprojx.In file
..._config_basic.hdefine the serial UART print flag (depends on the build target choose the config file here we will useda14531_config_basic.h) initially it is undefined. After the change the code should exactly like the code snippet below.
/* @file da14531_config_basic.h */
#define CFG_PRINTF
#ifdef CFG_PRINTF
        #define CFG_PRINTF_UART2
#endif
Check port configuration in file
user_periph_setup.h. If you are using DA14531 or DA14535 as a target which will select GPIO_PIN_0 and GPIO_PIN_6 as UART2 pins. Likewise if you use DA14585 kit and DA14585 as target GPIO_PIN_0 and GPIO_PIN_4 will be used for UART2. If it is not defined already then define those pins.
/* @file user_periph_setup.h */

// Define UART2 Tx Pad
#if defined (__DA14531__)
        #define UART2_TX_PORT           GPIO_PORT_0
        #define UART2_TX_PIN            GPIO_PIN_6
#else
        #define UART2_TX_PORT           GPIO_PORT_0
        #define UART2_TX_PIN            GPIO_PIN_4
#endif
Check UART settings in file user_periph_setup.h, if they are not defined then copy below snippet in the file.
/* @file user_periph_setup.h */

// Define UART2 Settings
#define UART2_BAUDRATE              UART_BAUDRATE_115200
#define UART2_DATABITS              UART_DATABITS_8
#define UART2_PARITY                UART_PARITY_NONE
#define UART2_STOPBITS              UART_STOPBITS_1
#define UART2_AFCE                  UART_AFCE_DIS
#define UART2_FIFO                  UART_FIFO_EN
#define UART2_TX_FIFO_LEVEL         UART_TX_FIFO_LEVEL_0
#define UART2_RX_FIFO_LEVEL         UART_RX_FIFO_LEVEL_0
In user_perih_setup.c check if UART configuration is defined, if not then copy the below snippet in the file.
/* @file user_periph_setup.c */
#if defined (CFG_PRINTF_UART2)
// Configuration struct for UART2
static const uart_cfg_t uart_cfg = {
        .baud_rate = UART2_BAUDRATE,
        .data_bits = UART2_DATABITS,
        .parity = UART2_PARITY,
        .stop_bits = UART2_STOPBITS,
        .auto_flow_control = UART2_AFCE,
        .use_fifo = UART2_FIFO,
        .tx_fifo_tr_lvl = UART2_TX_FIFO_LEVEL,
        .rx_fifo_tr_lvl = UART2_RX_FIFO_LEVEL,
        .intr_priority = 2,
};
#endif
In user_perih_setup.c check function
void GPIO_reservations(void)has UART GPIO pins reserved or not, if not then copy the below snippet in the function.
/* @file user_periph_setup.c */

/* @function void GPIO_reservations(void) */
#if defined (CFG_PRINTF_UART2)
RESERVE_GPIO(UART2_TX, UART2_TX_PORT, UART2_TX_PIN, PID_UART2_TX);
#endif
In user_perih_setup.c check function
void set_pad_functions(void)has UART GPIO pins configured or not, if not then copy the below snippet in the function.
/* @file user_periph_setup.c */

/* @function void set_pad_functions(void) */
#if defined (CFG_PRINTF_UART2)
// Configure UART2 TX Pad
GPIO_ConfigurePin(UART2_TX_PORT, UART2_TX_PIN, OUTPUT, PID_UART2_TX, false);
#endif
In user_perih_setup.c check function
void periph_init(void)has UART is Initialized or not, if not then copy the below snippet in the function.
/* @file user_periph_setup.c */

/* @function void periph_init(void) */
#if defined (CFG_PRINTF_UART2)
// Initialize UART2
uart_initialize(UART2, &uart_cfg);
#endif
Find user_profile.c under user_app project folder. In that file add #include “arch_console.h”. User should include this header in whichever file he wishes print debugging data on serial port.
/* @file user_profile.c */

/* copy and paste */
#include "arch_console.h"
In file user_profile.c on Line no. 230 there is a function
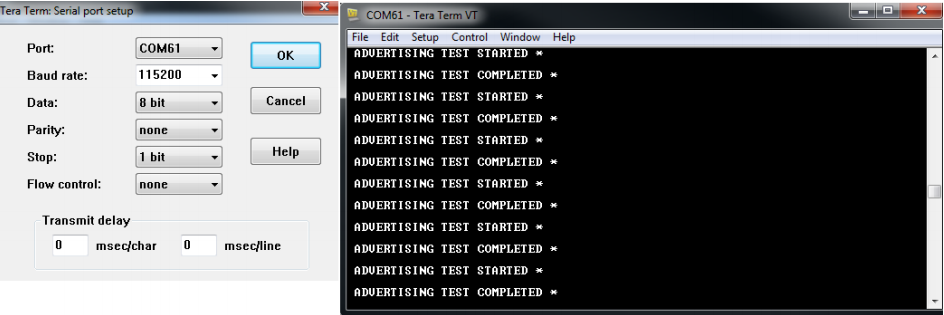
void user_app_adv_start(void). In the function add two lines//PRINTandarch_printf("\r\n ADVERTISING TEST STARTED *\r\n");just afterstruct gapm_start_advertise_cmd cmd;, exactly as shown in the code snippet below. This change will broadcast the message “ADVERTISING TEST STARTED” our the serial port.
/* @file user_profile.c */
void user_app_adv_start(void)
{
        // Schedule the next advertising data update
        app_adv_data_update_timer_used = app_easy_timer(APP_ADV_DATA_UPDATE_TO, adv_data_update_timer_cb);

        struct gapm_start_advertise_cmd* cmd;
        //PRINT
        arch_printf("\r\n ADVERTISING TEST STARTED *\r\n");
        cmd = app_easy_gap_undirected_advertise_get_active();

        // Add manufacturer data to initial advertising or scan response data, if there is enough space
        app_add_ad_struct(cmd, &mnf_data, sizeof(struct mnf_specific_data_ad_structure), 1);

        app_easy_gap_undirected_advertise_start();
}
You can also add ADVERTISING TEST COMPLETE message at end of the function in the similar way as done before.
We have used Teraterm as a terminal software and you can see the configuration below. Select the lower of the two detected COM port numbers.
2.2. Hardware Configuration
Connect the development boards as shown in below figure to connect UART TX pin of DA1453x/DA1458x to COM port of the development kit.

Figure 1 DA14531 DevkitP & DA14531 daughterboard

Figure 2 DA14531 DevkitP & DA14531 Tiny module

Figure 3 DA1453x DevkitP & DA14535 daughterboard

Figure 4 DA1453x DevkitP & DA14535 Tiny module

Figure 5 DA14585 Pro Development Kit & DA14585 daughterboard